When you are new to the coding world, a lot of new information can be overwhelming. Staying organized might help ease the learning process. This blog post is about simple ways to organize your Jupyter notebooks to make them more reproducible and user-friendly.
First, let me begin by introducing the Jupyter Notebook. It is a web application that is used for creating and sharing computational documents. The main advantages of Jupyter Notebooks are that they:
· Can have text, code, and visualization all in one place
· are easily shareable
· are interactive
· support many programming languages such as Julia, Python, and R (the 3 languages that give Jupyter its name)
· are open source
Following are some tips that beginners and experts alike can use to make Jupyter Notebooks more reproducible and user-friendly.
Comments and Markdown
Jupyter Notebook has an option of adding a ‘Markdown’ cell to add descriptions or comments. Please find more details on the ‘Markdown’ cell here and here.

Figure 1: Image showing the Markdown and Code cells in a Jupyter Notebook.
Use Markdown cells to give each section of the notebook a title and to describe what is being performed in the code in the following cell/s. In addition, add comments in the ‘Code’ cells to indicate what exactly is carried out (Figure 1). In Python, single-line comments are added by including a hash (‘#’) symbol preceding each comment line (eg: # example comment), and multi-line comments are added using triple quotes called docstring comments (eg: “““example multi-line comment”””). In languages like Javascript, C, or C++ single-line comments are added using two forward slashes (‘//’) (eg: // example comment), and multi-line comments are added using a forward slash and an asterisk (/*) (eg: /* example multi-line comment */). These comments and descriptions will be helpful for others (and your future self) in understanding the notebook.
Top-down execution order

Figure 2: Image showing the ‘Restart Kernel and Run All Cells` button in a Jupyter Notebook.
It is possible to run the cells in a notebook in any order you’d like, including running cells multiple times, which is common during debugging, playing with the data, or exploring different visualizations. But once the code cells and their corresponding outputs are finalized, it is better to make sure the notebook can be executed in sequential order, from the first cell to the last cell. This helps in reproducibility. Jupyter has a “Run All” button that will do this, however, it’s important to first restart the notebook before doing so, in order to clear the memory first so that you can catch situations where you are calling on variables that have not yet been created (Figure 2).
Smaller notebooks
Instead of doing all the analysis in a single giant Notebook, it is better to break down the tasks into smaller chunks and run those in separate notebooks. This helps in easily identifying errors and avoids running the whole notebook repeatedly if changes are made in the last step.
It is also a nice practice to save the intermediate files that you obtain at the end of each smaller task. Saving intermediate files saves lots of time if you unexpectedly run into issues at the end of your analysis because you can restart at the point you saved your intermediate file, and it also makes it easier for others to reproduce your results.
Functions
If you are performing a similar task in a notebook more than a couple of times, it is easier if the lines of code are made into a function. The advantages of writing a function would be,
i) to avoid writing the same lines of code over and over again,
ii) better readability,
iii) to make sure that the task is done in the same way wherever the function is used.

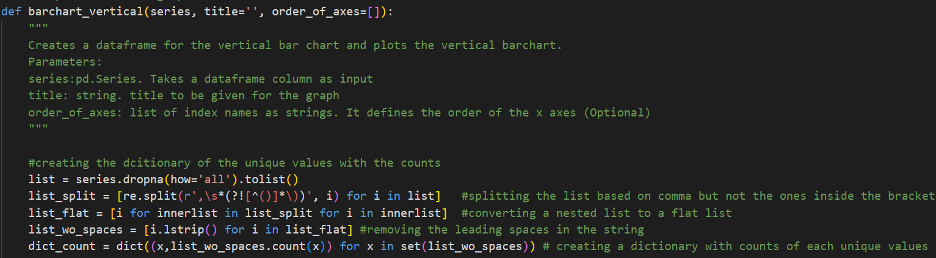
Figure 3: Image showing a Python function with a docstring comment describing what the function does. It also has parameters listed with the data type required by each argument.
It is always a good practice not to use Python keywords (list of Python keywords) while naming the functions and it is also better to have a long descriptive name (e.g. ParseColumnNames()) rather than short ones (e.g. pnc()). To make the user understand what the function exactly does, include a docstring comment describing the task of the function along with the data type each argument requires (Figure 3).
Many such functions can be written and saved as a separate .py file. The functions from the .py files can be imported as modules to be used across different notebooks. Any modifications that you make in the functions in the .py file will be automatically updated if you include the following lines of code in your Notebook:
%load_ext autoreload
%autoreload 2
If you want to use the functions saved in a different project, you can add the Python packages as a git submodule.
Requirements file
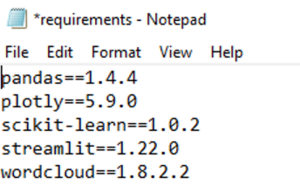
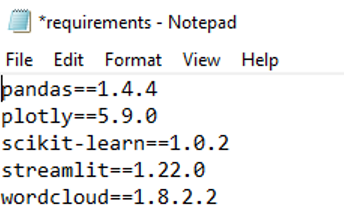
Figure 4: Image showing a sample requirements text file.
To help with reproducibility, it is always better to have the packages that are used in the notebooks listed along with their versions in a separate text file (requirements.txt) (Figure 4). This will help others to run the notebook without any discrepancies.
Interactive visualization
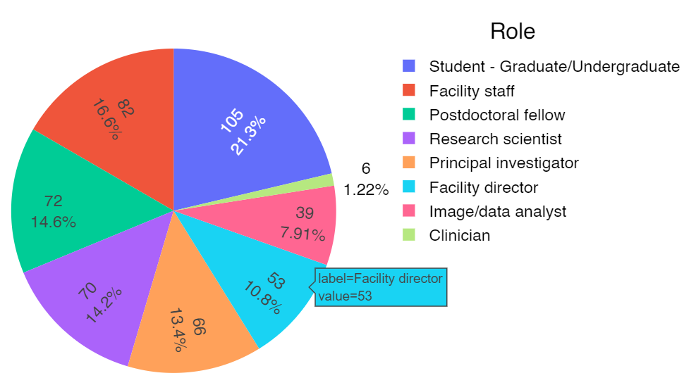
Figure 5: Interactive plot generated with Plotly displaying the details when the cursor is hovered over.
Jupyter notebooks are a great way to display visualizations, especially with the availability of a variety of interactive plotting Python packages such as Plotly (Figure 5). The interactivity of the packages is limited to the notebooks (once you save out a plot it is no longer interactive) and if you would like to share the interactive plots/figures with others you can either share the notebooks themselves or create web apps. If you have used Plotly to generate your figures, rather than sharing the .ipynb file which may be confusing to non-computational collaborators, the plots will still have interactivity if you export the notebook as an html file which is likely to be easier for non-computational collaborators to use.
Jupyter Notebook extensions
Jupyter Notebooks are user-friendly and you can make them more efficient and productive by using extensions. These extensions are written in javascript and they can add more functions to Notebooks, such as auto-completion of the code, adding a table of contents, displaying the run time in the cells, and many more. The extensions can be installed following the instructions here.
Version control
If you would like to share your Notebooks with others and also track all the changes that you have made, Github is the best way to do it. Tools like nbdime and reviewNB are available which allow you to see the changes that you made to your Notebook and you can decide whether to commit/push the changes to GitHub accordingly. For more details on these tools and usage, please visit this page.
If you are using Jupyter Notebooks in JupyterLab, version control becomes even easier. JupyterLab Git extension allows you to integrate Git and step-by-step instructions for the integration can be found here.
All in one place
Jupyter Notebooks are great for beginners but when you want to work with a big project, more functionalities are needed. If you would like to have functionalities such as version control, markdown, or the ones that you would get through Jupyter Notebook extensions, all in one place, you can integrate the Jupyter Notebooks with an Integrated Development Environment (IDE). VSCode, PyCharm, and Spyder are some of the popular IDEs for working with Jupyter Notebooks. If you would like to integrate the Jupyter Notebook with IDE, take VSCode for instance, you must install Jupyter package in a Python environment and activate it. The activated environment can then be selected which will then allow you to work with the Jupyter Notebooks on VS Code. More details on the integration and using Jupyter Notebooks on VSCode can be found here.
Jupyter has the latest web application called JupyterLab which has more features than the classic Jupyter Notebooks. It is an IDE that supports Jupyter Notebooks. Unlike Jupyter Notebooks, you can have the text editor, the Jupyter Notebooks, a directory viewer, and the terminal in one location. It also allows the user to have split views of the same Jupyter Notebook, a preview of the Markdown, and views of multiple tabs/Notebooks in the same window.
Each IDE has its pros and cons and you can decide to use the one that is suitable for you.
Final thoughts
In summary, to enhance Notebook readability, make it a practice to include descriptive comments, execute cells top-down, break down tasks into smaller Notebooks, and employ functions for repetitive tasks. Additionally, you can use Jupyter Notebooks in an IDE and also version control them for greater efficiency. By implementing these recommendations, you can effectively maintain your Jupyter Notebooks and facilitate seamless sharing while ensuring their reproducibility.