
Authors: Esteban Miglietta and Nodar Gogoberidze
In a previous post, we have already discussed what Docker containers are and how to build them. Here, we're going to talk about an alternative to Docker for managing containers: Podman.
But first...
What are software containers?
Software containers bundle together specific software tools, along with all their requirements, so that the software they contain may be executed in any environment, using the available hardware resources, but independently from other user environments in the host operating system.
What are containers useful for?
They are a great solution when you need to run several programs that have conflicting dependencies. For example, if you’re running on Windows and want to run an application that requires Linux, or if you want to use two or more programs that rely on the same dependency, but they require different versions of that dependency. Containers are also a handy way of dealing with programs that are just plain annoying to install. If you ever had to install applications that rely on deep learning libraries, you probably know what I mean.
Container management tools: Podman and Docker
In order to manage container images (the blueprint for instantiating containers) and orchestrate container executions, you will need a container management tool. Docker and Podman are two such tools that you can use through either a command line interface (CLI) or a graphical user interface (GUI): Docker Desktop and Podman Desktop. Both programs are free to use for individual users, but Docker currently requires purchasing a license for large organizations. Moreover, Podman has the added advantage of not requiring root privileges, and therefore is generally regarded as more secure and probably simpler to use in institutionally-managed computers. Finally, Podman is compatible with Docker images and its CLI commands, while having a GUI that is almost identical to Docker’s.
Podman and Docker allow you to search for and download tons of ready-to-use container images online in registries like DockerHub, but you can also use these programs to create your own!
The Containerfile
Now we’re getting a bit more into the technical details on how to make your own containerized software. Buckle up.
In order to create a container image, you will need to write a Containerfile or Dockerfile. Both are plain text files containing the instructions to build the container image (see Basic Podman Build Command below).
Containerfile is the more generic format used by many platforms, while Dockerfile is specific to Docker. Podman, however, can use either of the two, but will use the Containerfile by default if both are present.
Here’s an example Dockerfile for building a simple Python app, showcasing some of the basic commands (lines starting with "#" are comments, and are not executed):
#All container images are built by adding additional layers on top of an
existing image, which can be retrieved from Dockerhub. Here, we use a linux
image that already has python 3.9 installed
FROM python:3.9

#Set the working directory in the container
WORKDIR /app

#Copy the requirements.txt file from the current directory contents of the
host into the container’s working directory (/app)
COPY ./requrements.txt  /app

#Install any needed dependencies specified in requirements.txt
RUN pip install --no-cache-dir -r requirements.txt

#Make port 80 available to the world outside this container
EXPOSE 80

#Define environment variable
ENV NAME World

#Run app.py when the container launches
CMD ["python", "app.py"]
You can find more information on building Dockerfiles HERE (Containerfiles have identical content, commands, and features of Dockerfiles).
Create and start a Podman engine
Podman Desktop's container engine is responsible for managing the images and containers inside a Linux Virtual Machine (VM), if necessary. If you are on macOS or Windows and don't have a VM setup for the podman engine already, you need to open a terminal and run podman machine init to create one. You typically only need to do this once. If you are on Linux, you don't need a VM.
You can use podman system connection list to see the available machines.
Once you have created a machine, you need to initialize it using podman machine start. This will start the default machine.
Alternatively, you can also perform these steps in the GUI using Podman Desktop by going to Settings and, under Podman, selecting Create New...
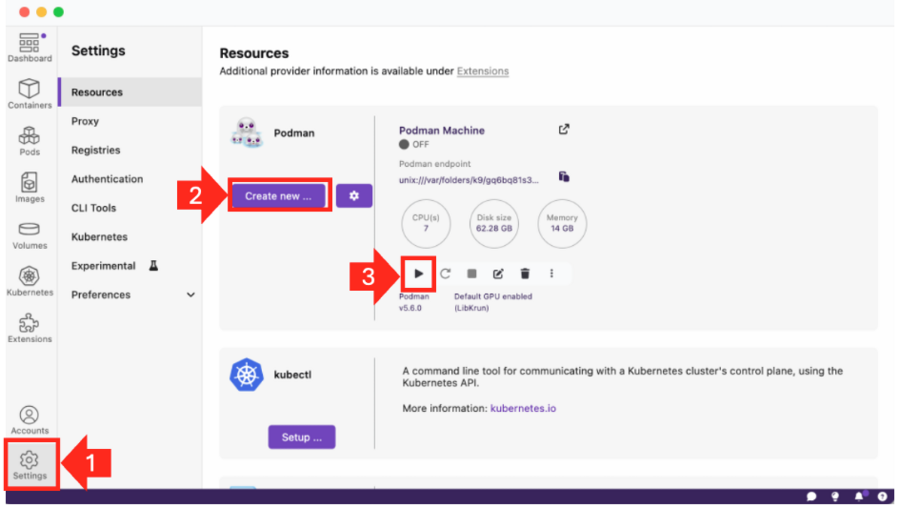
Finally, start your machine using the play ▶️ button.
Now you can proceed to build your container images.
Basic Podman Build Command
The basic CLI command for building an image with Podman is podman build:
podman build [OPTIONS] <context> [--tag <image_name>:<tag>]
- podman build: This will start the build process with Podman
- [OPTIONS]: You can specify various options for the build process.
- <context>: By default, the current directory is the context directory. You can specify some other directory. This is the directory containing the files that Podman will be able to access during the building process.
- --tag or just -t: OPTIONAL, you can tag the specific version for better management. Specifies the name that is assigned to the resulting image if the build process completes successfully. If image_name does not include a registry name, the registry name localhost is prepended to the image name.
You can specify the Dockerfile location with the context argument in the podman build command using the -f option:
podman build -f /path/to/Dockerfile
If you don't specify the Dockerfile using -f, Podman will expect your Dockerfile to live in the current working directory (or <context>) and to be named literally 'Dockerfile' or 'Containerfile'.
Specifying the platform of your container image
The platform—which refers to the central processing unit's (CPU's) instruction set architecture (ISA)—of your new Podman image must match the platform of the source image you based your Dockerfile on. If that's not the same platform as your computer, you have to use the flag --platform to specify it when building.
For example, if building on top of an Ubuntu (which is a particular distribution of Linux) base image. My Dockerfile could start with:
FROM ubuntu:20.04
Which is an image containing that specific Ubuntu version along with all its requirements.
If you don’t specify it otherwise when building my image, Podman will look up the base image from the Dockerhub repo, and match whatever is there with the platform compatible with the host computer, which in my case means it will pull the Ubuntu:20.04 image targeting the linux/arm64 platform (since I’m on M2 Mac, which has an arm64 ISA). It will also ensure all subsequent layers specified in the Dockerfile (each set of filesystem changes, i.e., additions, deletions, or modifications) are linux/arm64.
You can then ship the container off to any other computer that uses an arm64 ISA (M-Series Macs, or Windows/Linux machines set up with an ARM CPU), and it will run directly. However, if you’re interested in executing the platform specified for the image on another computer with a different architecture, like amd64 (older Macs with Intel x86_64 chips, most Windows, and many Linux machines), then that computer will have to do so through an emulator, which Podman and Docker will do automatically. This emulation, expectedly, comes at the cost of some performance overhead.
So, if the ISA of the host computer you plan on running the container in is different from the ISA of the computer you’re building the image on, but you don’t want to pay that performance overhead for emulation, what can you do?
You can use the --platform flag during building to specify which variant of the base image (in our example, Ubuntu:20.04) to pull from Dockerhub.
podman build -f PATH/TO/DOCKERFILE -t IMAGE_NAME:TAG --platform linux/amd64
With this, you are telling podman not to pull the base image matching your host computer's ISA, but instead explicitly pull the variant of the Ubuntu:20.04 image which targets linux/amd64 (i.e., the x86_64 ISA). It will also ensure all subsequent layers specified in the Dockerfile are Linux/amd64. In this case, emulation (and the performance overhead) will happen during the building of the image, and not when executing the containers on a host computer with the specified platform.
Another important reason why you would need to use the --platform flag is because you have to. If either the base layer or any of the binaries brought in by the intermediary layers are only available on amd64 architectures, then you have no choice but to force podman to build using amd64.
Testing the container
If you're building a new container image, which is set to execute some program upon starting (for example, execute cellprofiler: ENTRYPOINT ['cellprofiler']) but you first want to test it, you might need to override the ENTRYPOINT (default executable) using the --entrypoint flag when running it.
If you want to run tests, you might also want to bind mount a local directory into the container upon initializing it, so it can access the files within.
podman run -it --rm --entrypoint "/bin/sh" -v /path/to/local/folder:/path/in/container:Z IMAGE_NAME
- podman run: The command to create and run a container.
- -it: Runs the container in Interactive mode and allocates a TTY (terminal).
- --rm: Automatically removes the container filesystem after it exits.
- --entrypoint "/bin/sh": Overrides the image's default ENTRYPOINT to execute the /bin/sh interactive shell.
- IMAGE_NAME: The full image name to use. OPTIONAL: You can also choose a specific version of the image using a tag IMAGE_NAME:TAG
- -v /path/to/local/folder:/path/in/container:Z: bind mount a local directory in the host computer to the specified path in the container, so that the container can access the files contained within that directory.
- :Z: This is specific to Podman (and Docker on systems using SELinux, like Fedora or RHEL). It automatically relabels the content of the volume so that the container engine (Podman) can read and write to it. If you're not on an SELinux system, you can omit the :Z or use :z (lowercase) for shared content (read/write access to others). It's often safest to include :Z for a secure, private volume.
You can exit the container using the exit command on the shell.
Cleanup during troubleshooting
When trying (and failing) to build container images, Podman can accumulate unused files that take up space in the engine. You can manage and clean these from either the GUI or the CLI
From the CLI, you can check the list of available built images using podman image ls in the CLI to identify failed image builds.
Then, you can use podman image rm <IMAGE_ID> to remove an individual image (you can add the flag -f to force removal, even if it is in use by a container). Similarly, you can also use podman volume ls to get a list of all the mounted volumes and podman volume rm <VOLUME_ID> to delete a specific one.
You can use podman system df to check what things are taking space in the VM's disk and podman system prune to clean stopped containers, dangling images, and dangling build cache.
If running into a No space left on device error at any point while building images, check the disk settings in Podman Desktop Settings > Podman Machine > Settings and increase the memory allocated to the VM.
Upload to Docker Hub
After building a functional image, you can add it to an open registry so that other people might use the tool you just created!
First, you need to create a repository.
Then, you can upload your image with the appropriate tag in the CLI using:
podman login docker.io
    Username:
    Password:
podman tag YOUR_IMAGE_NAME:latest docker.io/USERNAME/YOUR_IMAGE_NAME:latest
podman push docker.io/USERNAME/YOUR_IMAGE_NAME:latest