Alice Lucas
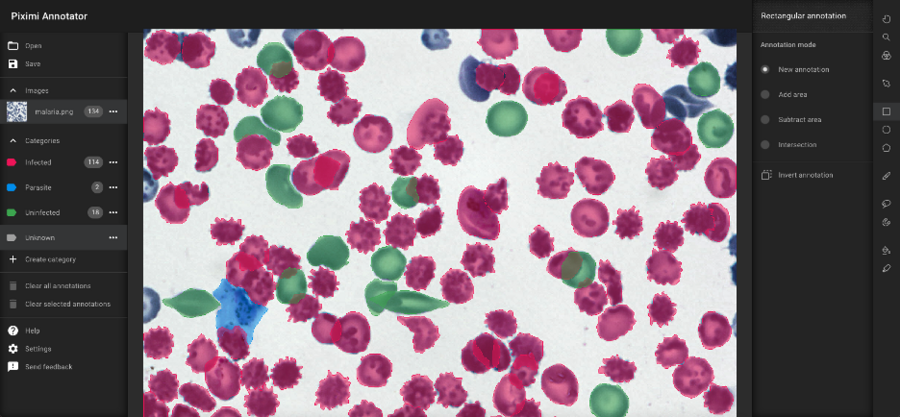
We’re delighted to release Piximi Annotator, a new image annotation tool that we built to be easily accessible, easy to use, yet with a full complement of annotation tools to allow for specific, refined annotations. Annotations are useful when training machine learning models to recognize specific structures and objects in images.
Wait...aren’t there already lots of annotation tools out there?
Absolutely! And many are great, but we needed a browser-based annotation tool that is easy to use and keeps all data local, which motivated us to create Piximi Annotator.
An easily accessible web application
Because Piximi Annotator is a web application, it is easy to access: simply open your favorite browser and click on this link: https://piximi.github.io/annotator/. No account or installation whatsoever is required, just drag an image (or multiple images) to your browser window and start annotating right away! Note that all images used in Piximi remain local on your computer; they are not uploaded to any server nor shared with us in any way. Piximi supports the .png, .jpg, and .tiff file formats; images can have either 1 or 3 channels and currently are supported in 2D only (with 3D support coming soon).
A minimalist application
While developing Piximi Annotator, one of our objectives was to provide an intuitive interface which provides useful controls without overwhelming new users.
Annotation tools: beyond bounding boxes
Piximi Annotator includes a variety of annotation tools to enable sensitive, specific annotations on a vast variety of image inputs. Check out a demo of a few of these functions here.
The rectangular, elliptical and polygonal annotation tools draw simple geometric shapes around the objects of interest. The pen annotation tool, with a customizable brush size, allows for freehand drawing.
For more intricate shapes, use the lasso tool to draw around the boundaries of an object and release it when ready to close the annotation.
Use the magnetic tool for cases where the object to be annotated has visible edges; the tool will automatically snap to these edges!
To annotate regions that are distinguishable by their color against the background, use the color annotation tool. This tool fills regions based on similarity to the color of the selected pixel.
Finally, the quick selection tool allows users to quickly annotate objects by selecting superpixels (a group of pixels that share common features) pre-computed from the image. The size of these superpixels can be varied using its corresponding brush size slider.
Using Piximi Annotator:
Creating annotations
To create a new annotation, simply select the desired annotation tool on the toolbar on the right and start annotating regions of interest. After each annotation, either hit “Confirm” on the canvas or press “Enter” on your keyboard to confirm the annotation. To cancel an annotation, hit “Cancel” on the canvas or press “Escape.”
Modifying existing annotations
After choosing the Pointer selection tool

on the top of the right toolbar, simply click on any annotation to select it. You can also select multiple annotations by clicking, holding, and dragging the mouse to draw a rectangle around the desired annotations.
To change the category of an existing annotation, first select the annotation and then click on the desired category.
To add or subtract area from an existing annotation, select any of the annotating tools you would like to use on the right toolbar, click on “add” or “subtract” selection mode, and draw where the added/subtracted region should be. Because Piximi annotations are not saved as polygons, it can support pixel-exact annotations containing holes or any other unusual shape you can imagine.
Saving the annotation project
We recommend that you save your project regularly. Saving the project is as easy as clicking the “Save -> Save project file” button. Similarly, clicking “Open -> Open project file” will open a saved project file.
A saved project file contains both the images and the annotations and so can be sent to any other user’s machine. All the user needs to do is access the web app and open the project file to resume the saved project. This makes it easy to share the task of annotating and/or easily check (and edit if needed) your collaborators’ annotations.
Exporting annotations for subsequent machine learning pipelines
Piximi Annotator allows annotations to be saved in multiple formats. Many of these formats can then be immediately used to train models in deep learning tools such as Tensorflow or Pytorch.
Choose “Labeled instance masks” to save all instances of a given category in a single output image, where each instance is labeled by a different (R, G, B) color. The “Label matrix” export option is similar, except that each instance is encoded by an integer (1, 2, 3, etc…) instead of a visible color.
Select the “Binary instance” mask option to save each instance in its own image file as a black and white mask.
The “Labeled semantic” mask option saves a single image, where the instances in the images are color-encoded based on their category. Note that this mode does not support overlapping annotations.
Finally, the “Binary semantic mask” export option downloads one image per category, where each instance in the image corresponds to that category only.
Beyond annotations
Piximi Annotator is just the first part in what we envision in a larger ecosystem of end-to-end image analysis tools that work entirely inside your own browser. Keep an eye on forum.image.sc and openbioimageanalysis.org (the home of COBA, which has funded this project) for the release of new components in the coming months!
Special thanks to Allen Goodman, Alice Lucas, David Stirling, and Pearl Ryder for helping develop this application!

