
David R. Stirling
Hi everyone,
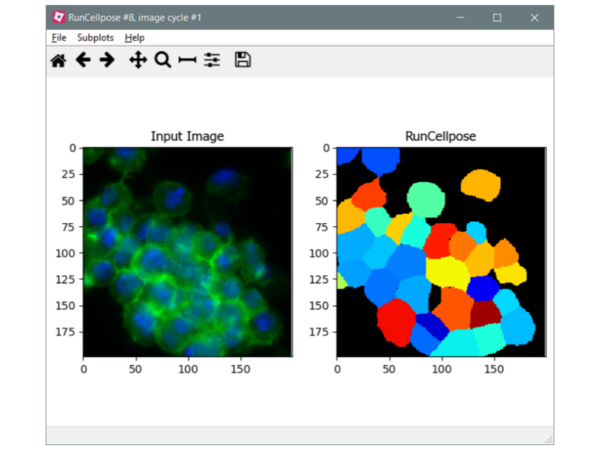
Today we’re releasing the RunCellpose plugin for CellProfiler 4! This plugin is designed to allow you to use the popular Cellpose segmentation algorithm to generate object sets within a CellProfiler pipeline.
Cellpose uses a neural network followed by post-processing steps to detect and segment objects in an image. This package is supplied with several pre-trained models geared towards detection of nuclei or whole cells. This software can provide an accessible means of detecting objects without prior knowledge of image processing strategies. Cellpose has its own user interface for training and running networks, which allows models to be customised for specific datasets.
The RunCellpose plugin provides a wrapper around the Cellpose package to allow you to call this software directly within a CellProfiler pipeline. You can use the inbuilt models or even provide one you’ve trained yourself. Functionally the RunCellpose plugin serves as an alternative to the native IdentifyPrimaryObjects and IdentifySecondaryObjects modules. Cellpose excels in detecting ‘typical’ cells and nuclei which can be found in many different experiments, without the need for fine-tuning of detection parameters.
This module can also be used with 3D datasets, though we recommend running on a GPU (see below) if doing so. 3D object detection can be challenging with CellProfiler’s core modules, so using Cellpose can provide good results in a fraction of the processing time.
Installation
Because Cellpose requires the PyTorch deep learning library, you’ll need to be running CellProfiler from the source code (Windows, macOS) instead of a pre-packaged build. On the resulting Python environment you’ll need to run `pip install cellpose` to correctly configure cellpose and the required dependencies. Once that’s done, drop the RunCellpose plugin script into the ‘Plugins’ folder specified in your CellProfiler preferences. The plugin should load in and be available next time you start CellProfiler.
If you have compatible hardware, you may also want to try running Cellpose on a graphics card (GPU). To do so you’ll need to follow the instructions here to configure a PyTorch version for your particular machine. Running on a GPU is substantially faster than on a CPU, so it’s well worth trying this if your system supports it. The plugin module includes a testing function to check if a GPU is configured correctly.
On first run Cellpose will automatically download its built-in models from the internet. This may mean that CellProfiler takes some time to start up after installing the plugin for the first time.
Configuration
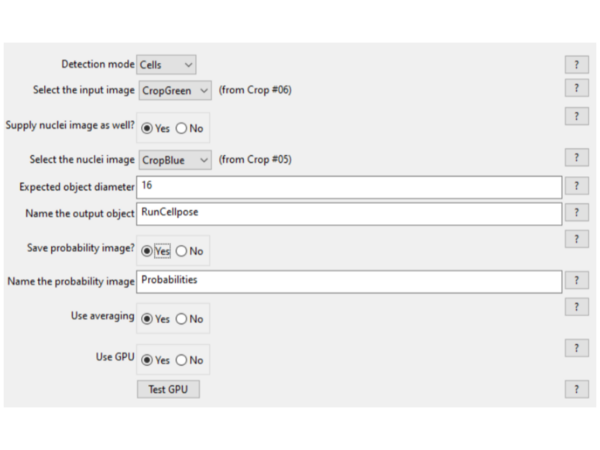
The plugin behaves as a standard CellProfiler module with a series of settings. Additional help and information is available by clicking on the ‘?’ buttons next to each setting.
The module is configured by selecting whether to detect cells, nuclei or a custom model supplied by the user. Input images are then chosen, with the option to supply a nuclear stain being available when detecting cells. Most importantly, RunCellpose needs to know the expected diameter of the objects that you’re trying to detect. Internally, the image will be rescaled to match the object diameter which the loaded model was trained to detect. This allows Cellpose to operate on data from different magnifications without needing specific training.
Once configured, RunCellpose should execute just like any other CellProfiler module. Resulting object sets (or pixel probability images if enabled) will be available in subsequent modules within the pipeline.
We’d like to especially thank the Cellpose team for creating such a powerful and well-documented tool. AI-powered image analysis is a promising direction for future development, and we hope that this plugin will expand the utility of both CellProfiler and Cellpose.