
Pearl V. Ryder
In the first post of this series, I gave an overview of this project and explained how I imported the data into CellProfiler. If you’d like to follow along in CellProfiler, the pipeline and images for this project are available here.
Now that the images have been imported, I could start the fun part - building a pipeline! My first step in building this pipeline was to examine the images and to think about segmenting the objects of interest: fibrils. One thing I noticed pretty quickly was that several images had very bright debris spots that were brighter than the extracellular fibers that I wanted to segment.
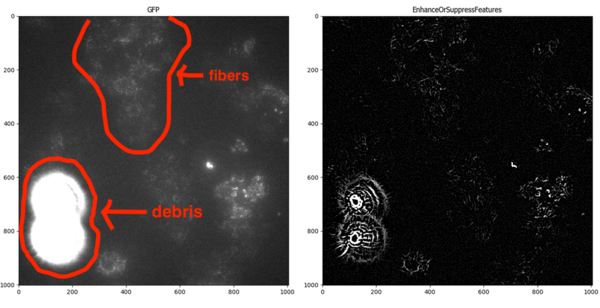
An example image showing a bright debris area relative to the fibers of interest. Note that the debris is significantly brighter than the fibers.
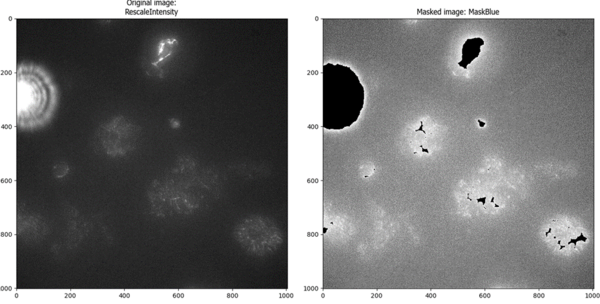
Since the debris is actually brighter than the fibers that I wanted to segment, I decided to first identify the bright debris spots as objects using IdentifyPrimaryObjects and then mask those areas of the image to exclude them from analysis.
I therefore had to identify which method would be optimal for thresholding bright noise from the rest of the image. I experimented with this using a Threshold module, in order to get a good sense of how these automatic methods perform on the images without the extra steps performed by IdentifyPrimaryObjects. In a future step, I deleted this Threshold module and switched to using IdentifyPrimaryObjects, which has more parameters for size filtering and adding lower and upper bounds, which are helpful (but can be distracting when you really want to focus on how the threshold method works!).
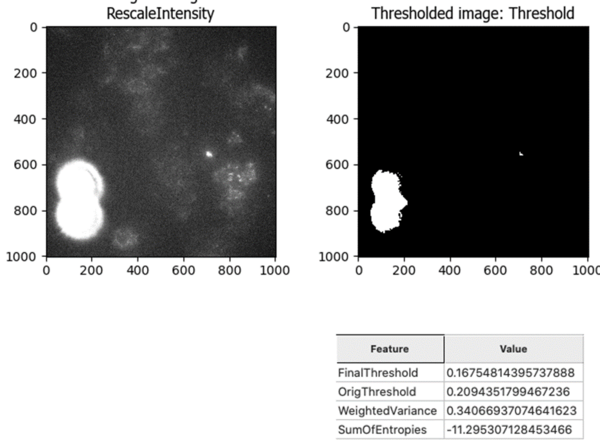
An early trial using an Otsu three-class threshold method was able to identify some of the bright spots in this image, almost all the way to the edge:
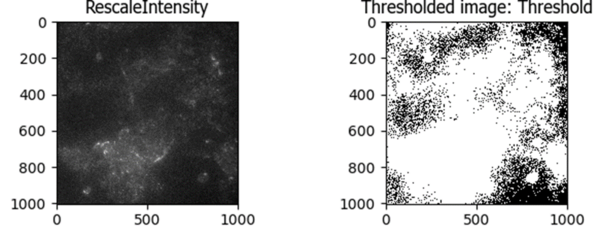
But the same thresholding method failed spectacularly when there was not bright debris in the image (most of the image was identified as above-threshold, which would result in losing a lot of good quality data):
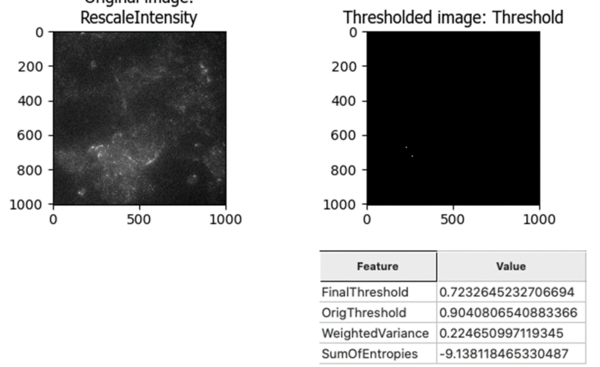
This led me to the Robust Background method, which works much better for this “good image” that lacks bright debris:
And the Robust Background does still pick up the bright spots that we want to identify:
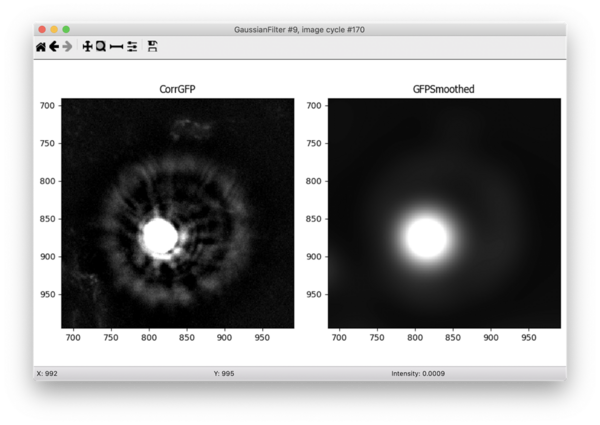
I noticed that the bright noise spots tend to have bright surrounding rings that are hard to accurately segment. For this reason, I added a Gaussian filter to smooth the image prior to segmenting the debris. This filter blurs the smaller surrounding rings with the background and allows me to capture only the brightest center spot as an object. In order to mask out those surrounding rings, I expanded the center objects in the next step.
I was now ready to use IdentifyPrimaryObjects to create noise objects. I used quite a wide range of diameters for the objects for the size filters (10 - 500 pixels in diameter) and the Robust Background method that I previously determined works well for this type of image. I turned off declumping since these bright debris are almost never close together and I tried out the default settings for the Robust Background on several images.
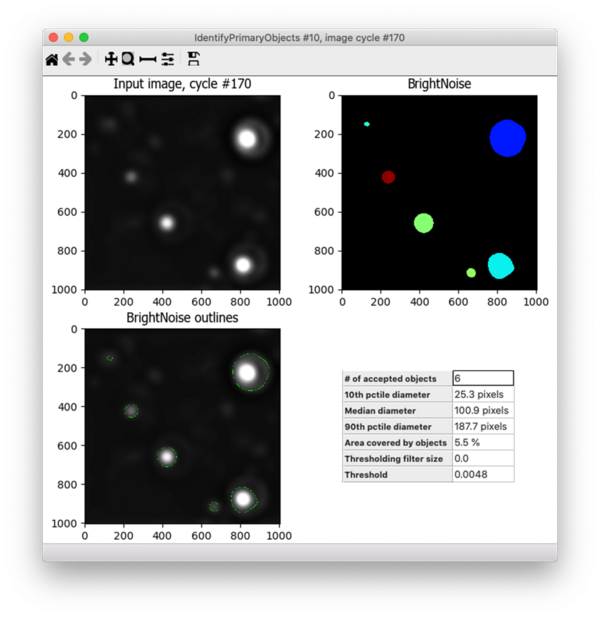
I found that the default settings for Robust Background were often a bit too permissive - they were capturing dim spots that were in fact bright fibrils deposited by the cells rather than the bright debris I was trying to eliminate, such as the spot in the upper left corner of the image below. I needed to increase the threshold.
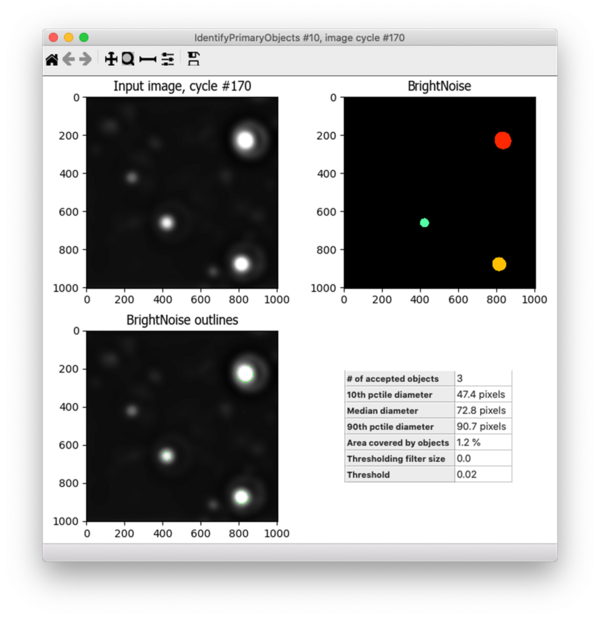
Under the default settings, Robust Background will set the threshold at the mean + 5 standard deviations (for more info about how the Robust Background method works, see this post). Since I wanted to increase the threshold, I changed the “# of deviations” to add to the mean and tried out many different settings (10, 15, 25, etc.). For each of these, I tested the resulting segmentation across many different images - both those with bright noise debris and those without, as well as some that had very dim signal and others with very bright fibril signal. I ultimately settled on adding 10 standard deviations to the mean, which performed well across these conditions. Because the pixel intensity of the fibrils varies widely across this dataset, I also added a lower bound to the threshold of 0.02, which helps to prevent identifying bright fibrils as noise since real fibrils are not that bright but debris can be. Here’s the final result - the bright spots are correctly identified but the dimmer ones are not:
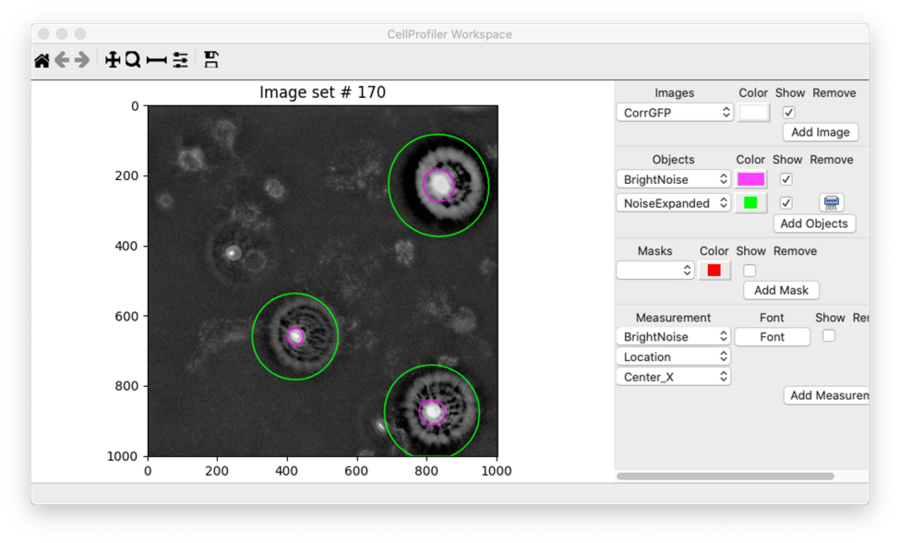
Finally, I added an ExpandOrShrinkObjects module in order to expand the bright noise spots detected with IdentifyPrimaryObjects by a specified number of pixels. In practice, it’s very common to expand objects prior to masking. I used the Workspace viewer to determine how many pixels to expand by and ultimately selected 100 pixels. In this Workspace, I’ve set the IdentifyPrimaryObjects output to have a magenta outline while the expanded noise has a green outline:
I’ll use these expanded objects as a mask within the MaskImage module to prevent the bright debris from being included in the analysis. Ultimately, building this aspect of the workflow was one of the most challenging aspects of building this pipeline.
By removing these bright intensity pixels from the object, I was one step closer to segmenting the fibrils. In the next post, I’ll show how I made the fibrils even brighter in intensity and decreased the background using image enhancement and background subtraction, respectively.